If you've landed on this page, I know your feelings. Wanna know how it feels when it's done? Ride on, it's like Roller Coaster...
You have successfully configured a single-node cluster in 7 easy steps. Good! But you are yet to taste the real essence of Hadoop. Recall that the primary purpose of Hadoop is to distribute a very lengthy task to more than one machines. This is exactly what we are going to do, but the only difference is that we will be doing so in Virtual machines.
- Launch your Virtual Machine from Virtualbox
- Open your terminal and run:
$ sudo nano /etc/sysctl.conf
- Add the following lines at the end of the file:
# Disable ipv6
net.ipv6.conf.all.disable_ipv6 = 1
net.ipv6.conf.default.disable_ipv6 = 1
net.ipv6.conf.lo.disable_ipv6 = 1

- Now you'll have to reboot the machine. Sorry :(
- Run the following command to check if IPv6 is really disabled:
$ cat /proc/sys/net/ipv6/conf/all/disable_ipv6
You should get 1 as output, meaning that IPv6 is disabled.

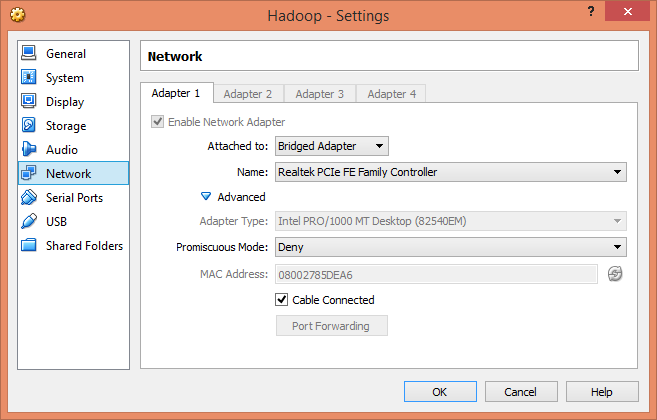
Next, we change the Network Settings of Virtual Machine.
- Go to Virtual Machine's Menu > Devices > Network Settings..
- Change the Network Attached to from NAT to Bridged Adapter and choose your Network Adapter from below. Mine is as shown in the image.
Now we change our Ubuntu's IP addressing from Dynamic to Static. This is because we will be using fixed IPs:
- On your Ubuntu's desktop, open Networks window from Top-Right menu by Clicking Edit Connections
- From the same menu, also open Connection Information. This is handy to enter correct settings
- Edit the only connection (if you have multiple, you may want to remove the ones not in use)
- Go to IPv4 Settings and Changed the Method to Manual
- Add a new Address by looking at the Connection Information. You should change the last number to something like 10, 50, or 100
- Gateway and Netmask should remain similar to that of Connection Information
- Save the Settings and Close; the Network should refresh itself
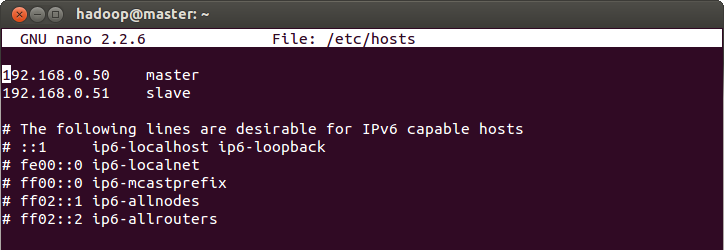
We are not done yet. We now need to define what our Master and Slave machines will be called (defining aliases) in the Network:
- On terminal run:
$ sudo nano /etc/hosts
- Replace the local address from 127.0.0.1 localhost to your machine's IP address and call it master
192.168.0.50 master
- Also, comment out all the lines below, which are related to IPv6
- Change localhost to master. This will make your first line look like:
192.168.0.50 master
- Add another like for slave:
192.168.0.51 slave
Recall that in our single-node set up, we configured some xml files and defined the machine's name as localhost. Well! We'll have to change the localhost to master now:
- Edit the core-site.xml
$ sudo nano /usr/local/hadoop/conf/core-sites.xml
- Change localhost to master

- Save and exit
- Now edit the mapred-site.xml in similar way
$ sudo nano /usr/local/hadoop/conf/mapred-sites.xml
- Change localhost to master
Finally, shut down the machine. We have to clone it
$ sudo nano /etc/hostname

- In both master and slave machine, clear existing files from /home/hadoop/.ssh directory
$ sudo rm /home/hadoop/.ssh/*
- Now generate a new public key for SSH. For details, check step 3 here
$ ssh-keygen -t rsa -P ""
- Copy the key to authorized_keys list
$ cat /home/hadoop/.ssh/id_rsa.pub >> /home/hadoop/.ssh/authorized_keys
- Try the SSH to master from master and slave from slave itself:
On master
$ ssh master
On slave
$ ssh slave
If you experience having to write password because of "Agent admitted failure to sign using the key" error on any of the machines, then you'll have to run the following command to fix it:
$ ssh-add
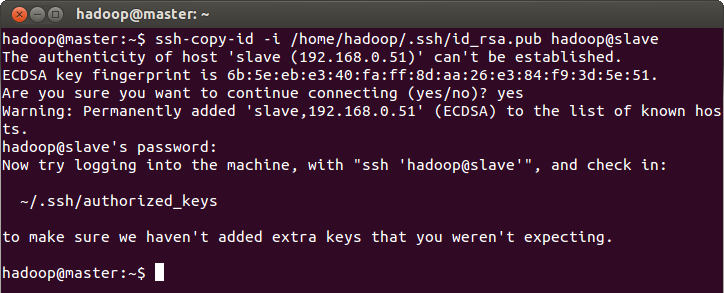
We will have to copy the master's public key to slave machine as well. On master, run:
$ ssh-copy-id -i /home/hadoop/.ssh/id_rsa.pub hadoop@slave
You will be asked for slave's password to continue (this should be same as master's if you haven't changed explicitly).
We should now be able to connect to slave from master. Why not try out? Run:
$ ssh slave
You should see a successful connection if nothing went wrong.

- Exit the SSH connection to slave:
$ exit
- In your master machine, edit the /usr/local/hadoop/conf/masters file:
$ sudo nano /usr/local/hadoop/conf/masters
- Write master

- Save and exit
- In same machine, edit the /usr/local/hadoop/conf/slaves file:
$ sudo nano /usr/local/hadoop/conf/slaves
- Write master in first line and slave in second

- Save and exit
Since we have 2 machines now, we can enable replication in hdfs-site.xml
$ sudo nano /usr/local/hadoop/conf/hdfs-site.xml
- Change the value to 2
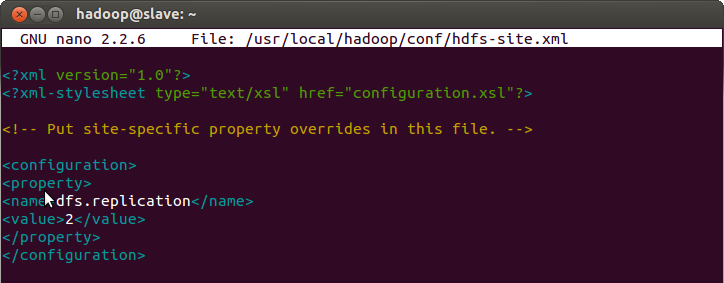
- Save and exit
$ hadoop namenode -format
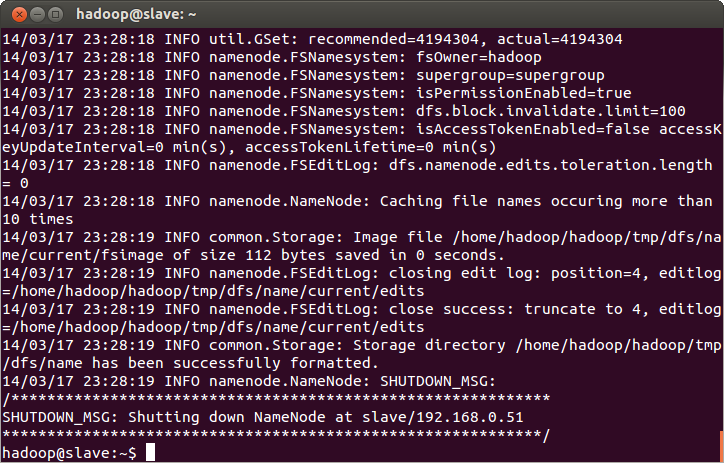
- Start Namenode, Secondary Namenode and JobTracker on master and Datanode and TaskTracker on both master and slave
$ start-all.sh
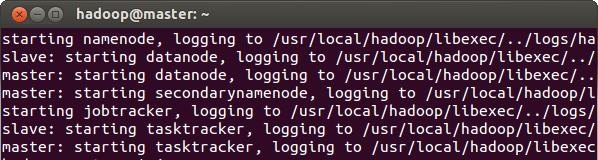
- Run Jps utility on master to check running services:
$ jps

- Similarly, run Jps utility on check to check running services:
$ jps


- Copy some more text files in the /home/hadoop/Documents/books (assuming you have already run this example previously)
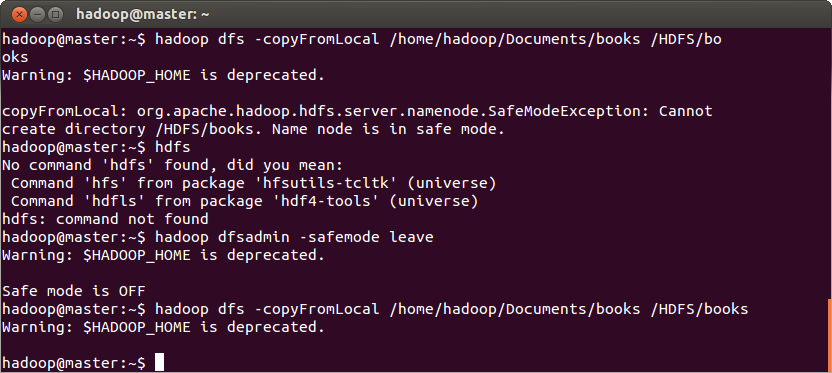
- Copy the files in HDFS. Run:
$ hadoop dfs -copyFromLocal /home/hadoop/Documents/books /HDFS/books
Important! If you see a SafeModeException that are keeping the files from copying, turn off the Hadoop safe mode by running:
$ hadoop dfsadmin -safemode leave
You may require this because initially, Hadoop runs in fail safe mode and does not allow certain services. It then transitions into normal mode; this transitioning may not happen sometimes.
- Run the wordcount example
$ hadoop jar $HADOOP_HOME/hadoop-examples-1.2.1.jar wordcount /HDFS/books /HDFS/books/output
- Collect the output:
$ hadoop dfs –getmerge /HDFS/books/output $HOME/Documents/books/
The MapReduce tasks on different nodes can be seen on master:50030
At this point, if you're not feeling like praying, or give a hug to the person sitting next to you, or dancing on the table, then you have no emotion.. :-|
End Note:
* All the experiments were performed on my Lenovo Ideapad U510 laptop with moderate specifications.
* If you find some images not being displayed (I have absolutely no idea why this happens), I have put them here for download.
You have successfully configured a single-node cluster in 7 easy steps. Good! But you are yet to taste the real essence of Hadoop. Recall that the primary purpose of Hadoop is to distribute a very lengthy task to more than one machines. This is exactly what we are going to do, but the only difference is that we will be doing so in Virtual machines.
Step 1: Networking
We have several things to do first with the existing VM, beginning with disabling IPv6. This is a recommendation because Hadoop currently does not support IPv6 according to their official Wiki. In order to do so, you will have to modify a fine named /etc/sysctl.conf:- Launch your Virtual Machine from Virtualbox
- Open your terminal and run:
$ sudo nano /etc/sysctl.conf
- Add the following lines at the end of the file:
# Disable ipv6
net.ipv6.conf.all.disable_ipv6 = 1
net.ipv6.conf.default.disable_ipv6 = 1
net.ipv6.conf.lo.disable_ipv6 = 1
- Now you'll have to reboot the machine. Sorry :(
- Run the following command to check if IPv6 is really disabled:
$ cat /proc/sys/net/ipv6/conf/all/disable_ipv6
You should get 1 as output, meaning that IPv6 is disabled.
Next, we change the Network Settings of Virtual Machine.
- Go to Virtual Machine's Menu > Devices > Network Settings..
- Change the Network Attached to from NAT to Bridged Adapter and choose your Network Adapter from below. Mine is as shown in the image.
Now we change our Ubuntu's IP addressing from Dynamic to Static. This is because we will be using fixed IPs:
- On your Ubuntu's desktop, open Networks window from Top-Right menu by Clicking Edit Connections
- From the same menu, also open Connection Information. This is handy to enter correct settings
- Edit the only connection (if you have multiple, you may want to remove the ones not in use)
- Go to IPv4 Settings and Changed the Method to Manual
- Add a new Address by looking at the Connection Information. You should change the last number to something like 10, 50, or 100
- Gateway and Netmask should remain similar to that of Connection Information
- Save the Settings and Close; the Network should refresh itself
We are not done yet. We now need to define what our Master and Slave machines will be called (defining aliases) in the Network:
- On terminal run:
$ sudo nano /etc/hosts
- Replace the local address from 127.0.0.1 localhost to your machine's IP address and call it master
192.168.0.50 master
- Also, comment out all the lines below, which are related to IPv6
- Change localhost to master. This will make your first line look like:
192.168.0.50 master
- Add another like for slave:
192.168.0.51 slave
Recall that in our single-node set up, we configured some xml files and defined the machine's name as localhost. Well! We'll have to change the localhost to master now:
- Edit the core-site.xml
$ sudo nano /usr/local/hadoop/conf/core-sites.xml
- Change localhost to master
- Save and exit
- Now edit the mapred-site.xml in similar way
$ sudo nano /usr/local/hadoop/conf/mapred-sites.xml
- Change localhost to master
- Save and exit
Step 2: Cloning Virtual Machine
Thanks to VirtualBox's built-in features that we won't have to create another machine from the scratch:
- Right click on Hadoop VM > Clone
- Name the new machine Hadoop Clone
- Next, choose Full clone
- Next, choose Current machine state and Clone

You may want to check this if you encounter problems.
After completion, launch both Virtual Machines. But please watch your memory resources, if you have a total of 4GB, then reduce the size of both VMs' memories to 1GB each in their settings.
Log into both machines and following the steps of change the IP address of newly created clone from 192.168.0.50 to 192.168.0.51 (or whatever you have to set). Wait until the Network refreshes.
This clone is your original machine's Slave. Now we need to define hostname for both machines. Edit the file /etc/hostname. Run:
$ sudo nano /etc/hostname
- Change localhost to master on your master machine and to slave on your slave machine
- Save and Exit
- Restart both machines to apply changes
Step 3: Connectivity
We need to ensure that SSH access is available from master to slave. On master, we already have SSH configured, but we will need to regenerate SSH key on slave machine because it is a clone of master and we should always have a unique key for machines.- In both master and slave machine, clear existing files from /home/hadoop/.ssh directory
$ sudo rm /home/hadoop/.ssh/*
- Now generate a new public key for SSH. For details, check step 3 here
$ ssh-keygen -t rsa -P ""
- Copy the key to authorized_keys list
$ cat /home/hadoop/.ssh/id_rsa.pub >> /home/hadoop/.ssh/authorized_keys
- Try the SSH to master from master and slave from slave itself:
On master
$ ssh master
On slave
$ ssh slave
If you experience having to write password because of "Agent admitted failure to sign using the key" error on any of the machines, then you'll have to run the following command to fix it:
$ ssh-add
We will have to copy the master's public key to slave machine as well. On master, run:
$ ssh-copy-id -i /home/hadoop/.ssh/id_rsa.pub hadoop@slave
You will be asked for slave's password to continue (this should be same as master's if you haven't changed explicitly).
We should now be able to connect to slave from master. Why not try out? Run:
$ ssh slave
You should see a successful connection if nothing went wrong.
- Exit the SSH connection to slave:
$ exit
Step 4: Configuring Hadoop Resources
We will run all services on Master node and only TaskTracker and DataNode on slave machines; on large-scale deployments, you may be running Secondary Namenodes and also, may not be running TaskTracker and DataNode on master (when master is dedicated for task assignments only, not executing). We will define which machine will be actual master for Hadoop and which ones will be Slaves (or workers).- In your master machine, edit the /usr/local/hadoop/conf/masters file:
$ sudo nano /usr/local/hadoop/conf/masters
- Write master
- Save and exit
- In same machine, edit the /usr/local/hadoop/conf/slaves file:
$ sudo nano /usr/local/hadoop/conf/slaves
- Write master in first line and slave in second
- Save and exit
Since we have 2 machines now, we can enable replication in hdfs-site.xml
$ sudo nano /usr/local/hadoop/conf/hdfs-site.xml
- Change the value to 2
- Save and exit
Step 5: Invoking Demons
Format the HDFS file system first:$ hadoop namenode -format
- Start Namenode, Secondary Namenode and JobTracker on master and Datanode and TaskTracker on both master and slave
$ start-all.sh
- Run Jps utility on master to check running services:
$ jps
- Similarly, run Jps utility on check to check running services:
$ jps
Important! If you see Datanode service not running on any of the machines, then retry this whole step after rebooting the machine that is missing it. If the problem still persists, you'll have to look deeper. Open the Datanode log of the machine:
$ sudo nano /usr/local/hadoop/logs/hadoop-hadoop-datanode-slave.log (or master.log)
If you find a java.io.IOException, saying Incompatible namespaceIDs. Then you'll have to manually correct the datanode namespace ID; this should be identical to the ID. Look for the namenode namespace ID and replace it in your dfs directory (this is defined in hdfs-sites.xml as a property, but in our case, this should be in /home/hadoop/tmp/dfs/data/current/VERSION
- Now stop and start all service on master
$ stop-all.sh
$ start-all.sh
Step 6: Executing MapReduce Application
We will try the same word count example. On master- Copy some more text files in the /home/hadoop/Documents/books (assuming you have already run this example previously)
- Copy the files in HDFS. Run:
$ hadoop dfs -copyFromLocal /home/hadoop/Documents/books /HDFS/books
Important! If you see a SafeModeException that are keeping the files from copying, turn off the Hadoop safe mode by running:
$ hadoop dfsadmin -safemode leave
You may require this because initially, Hadoop runs in fail safe mode and does not allow certain services. It then transitions into normal mode; this transitioning may not happen sometimes.
- Run the wordcount example
$ hadoop jar $HADOOP_HOME/hadoop-examples-1.2.1.jar wordcount /HDFS/books /HDFS/books/output
- Collect the output:
$ hadoop dfs –getmerge /HDFS/books/output $HOME/Documents/books/
Step 7: Tracking the Progress
You can track the status of NameNode on your browser master:50070The MapReduce tasks on different nodes can be seen on master:50030
At this point, if you're not feeling like praying, or give a hug to the person sitting next to you, or dancing on the table, then you have no emotion.. :-|
If you have arrived to here seamlessly, or with some glitches that you were able to fix by yourself, then you can certainly deploy a multi-node cluster with more than 2 nodes in real World with little effort. I would still recommend to try to extend the existing set up to 3 nodes and maybe on multiple Virtual Machines on different Physical Machines. You may also try to run your own applications via Eclipse on larger data sets to enjoy real Hadoop experience.
Happy Hadooping...
* All the experiments were performed on my Lenovo Ideapad U510 laptop with moderate specifications.
* If you find some images not being displayed (I have absolutely no idea why this happens), I have put them here for download.
Comments
Post a Comment