A really brief Intro..
Researcher, Trying to execute an extremely computationally resource hungry experiment?
App developer, unsure of how much data you'll be collecting from the users?
Student, tasked to build your FYP (final year project) on distributed computing environment?
Just an ordinary techie trying to catch up with the world?
If you're any of these, you cannot escape the fact that Cloud computing is storming in and you have to engage yourself actively in it. Adopt it, or perish.
I'm a newbie (better say wannabe) in this massive web of computing, and here just to share some experiences I'm having - successes and failures.
First of all, Cloud computing is nothing new, it has been there for over 3 decades and was referred with names like Grid computing and Distributed computing. It was business people that came up with a catchy name to attract business.
The idea behind distributed computing is simple. We create a network of computers to do handle complex tasks that a single computer cannot do. Cloud computing takes this concept a few steps ahead, creating redundancy of data and processing units such that if one machine goes down, the other backs your job up and providing a range of services from applications to data centers on the basis of usage (unlike fixed rant). Here is a good read on what cloud computing offers.
We will now have a look at how to practically set up our own cloud applications and make use of the power of cloud to solve our everyday problems. For this purpose, we'll play with Amazon Web Services, a.k.a. AWS, which is thus far the most successful cloud services provider.
In this post, we will attempt to set up an instance of virtual machine on AWS.
Let's dive...
The first step is to sign-up. For this purpose, all you need is to provide your basic info and a working credit card. Don't worry, Amazon won't be charging more than 1USD unless you start subscribing services.
Once you're through this step, you should be able to log into your AWS account and see this dashboard:

Yes, there are a ton of options. That's why Amazon is so successful. But we'll just taste a bite of this dessert here. The first thing to note is that there are 11 data centers where Amazon hosts its services; we are connected to Oregon.
The good news is that Amazon allows you 12 months of free (but limited) usage to try out different services before you actually use them at large. Please go through the details before proceeding.
Let's talk about the first option - EC2, or Elastic Computing Cloud. This is a service that can resize itself to fit your computing needs. You can create, run, and terminate virtual server instances, supporting a variety of technologies.
To access this service, go to the Top-left corner of the AWS services and click EC2.

Of course, no instances running. We will be creating a new instance. But first, we need an Identity key. To create one, again from AWS console (home) and follow the steps:
Step 1: Go to the highlighted option Identity & Access Management

You should see the dashboard with nothing running.
Step 2: We'll start by creating a Group and assigning it administrative rights.

Note: If you like, you can customize your aliases with something other than the number given, like I renamed it to https://owaisahussain.signin.aws.amazon.com/console
Step 3: Now go to groups and create one. I named my group vision360. You should also grant AdministrativeAccess to ensure that the group you created has full rights. You can create more groups like this as well.


On next window, review the changes and create group.
Since we have a group, the next obvious thing is to add a user to associate with this group.
Step 4: Go ahead and click the Users link on navigation pane:

Click Create New Users and add user accounts you want to create. For now, we'll just go with mine. When you create a user, IAM creates an access key ID and secret access key. This information is sensitive and should be kept secret. You may also download this key pair for future use.

Next, select the newly created user and add it to the previously created vision360 group from User Actions.

From the same User Actions, go to Manage Password and assign a new password of your choice (should be strong).
Now, just like you created an identity for yourself, the virtual machines on the cloud need an identity as well. We do this by creating key pairs, which are used to secure the login credentials for your instance (virtual machines). Follow the steps below to create a key pair for your machine:
Step 1: Go back to the EC2 Console and in the navigation panel, click Key Pairs.

Caution! Different regions have different key pairs. Therefore, if you are going to work on a region closer to you, now is the time to change from top-right. I changed mine to Singapore.
Step 2: Create a key pair and give it a suitable name and click Create.

Note that as you create the key pair, a .pem file is downloaded automatically to your computer. Keep this file safe as this is a footprint of your Key generated using RSA algorithm.
We will use this certificate to connect to Linux using secure shell. On windows, this is done by using PuTTy. In fact, just go on, download and install this lightweight tool.
We are now set to launch our EC2 instance. Here are the steps to do so:
Step 1: Go on and click Launch Instance button on EC2 console.

Caution! MUST Check Free tier only option to limit your selection. Or don't complain of bucks missing from your credit card :-)
Step 2: There are 22 types available and just like you, I have no clue which one to choose. But let's think about our selection. We may need Linux due to its flexibility and the preferred choice would probably be Amazon Linux due to its variety in terms of support. Let's hit Select.

Note: Hovering over the selected tier reads: Micro instances are eligible for the AWS free usage tier. For the first 12 months following your AWS sign-up date, you get up to 750 hours of micro instances each month. When your free usage tier expires or if your usage exceeds the free tier restrictions, you pay standard, pay-as-you-go service rates.
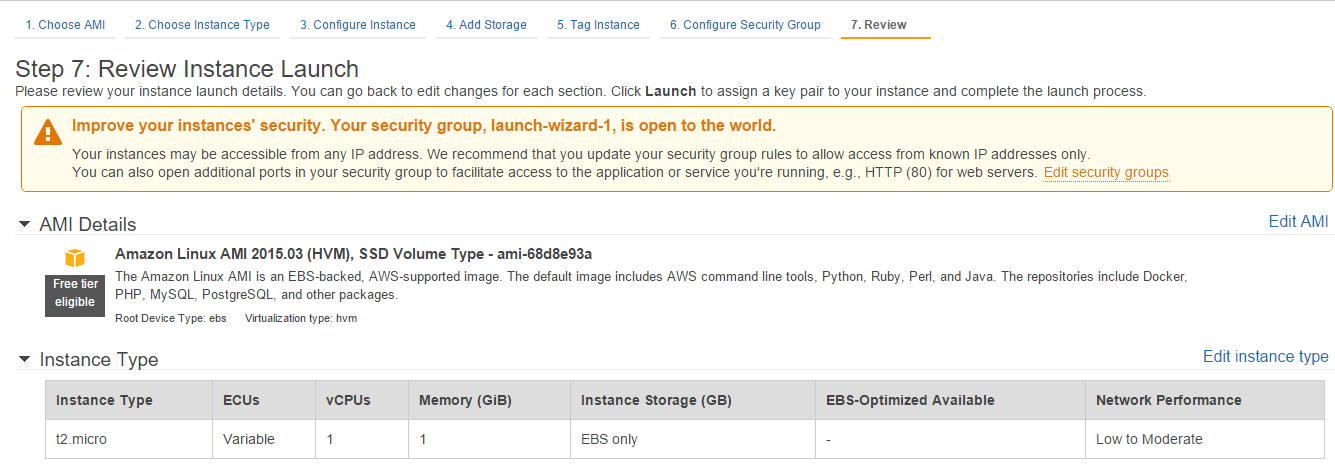
Step 3: Another lengthy table of options to choose from. Here, you define your specific requirements. Although we're going with the free tier (t2.micro), but for real world applications, you should carefully choose your instance according to your computational needs. AWS has options for general purpose, memory optimized, storage optimized, CPU optimized and graphics optimized instances. For now, select t2.micro and click Review and Launch.
Note that we skipped some configuration options, like Storage, Tag and Security Group. These are for you to explore, but let's just have a few sentences on these:
- Configure Instance: offers various networking options, some incurring charges.
- Add Storage: is self-explanatory. The free tier is on limited magnetic disk drive, but you can add more storage to fit your needs as per requirements
- Tag Instance: simply labels your instance, for example: "DataScienceProject-1". You may need this when creating several instances
- Configure Security Group: can create new rules about how you would restrict access to your instance. For example, you can limit the SSH (secure shell) access to your own IP address only
Step 4: Finally, click Launch button, which would bring a popup and ask if you want to proceed with a key or without any? We shall select the key we created earlier. You can also create new Key pair here. Check "I acknowledge..." option and click Launch Instances.

And that's was all. You just created and launched your first EC2 instance on AWS. Next, we'll have a look at what to do with this free resource.
I'm a newcomer and may have made plenty of mistakes. Please leave comments for corrections wherever you find them.
Thanks!
Comments
Post a Comment