Connecting to Cloud
Previously, we looked at how to configure an EC2 instance on AWS. If you're not sure what this sentence was about, click here.
In this post, we'll look at some ways to connect to your EC2 instance and try out an example. I'm assuming you already know how to get to the EC2 console page from AWS home.
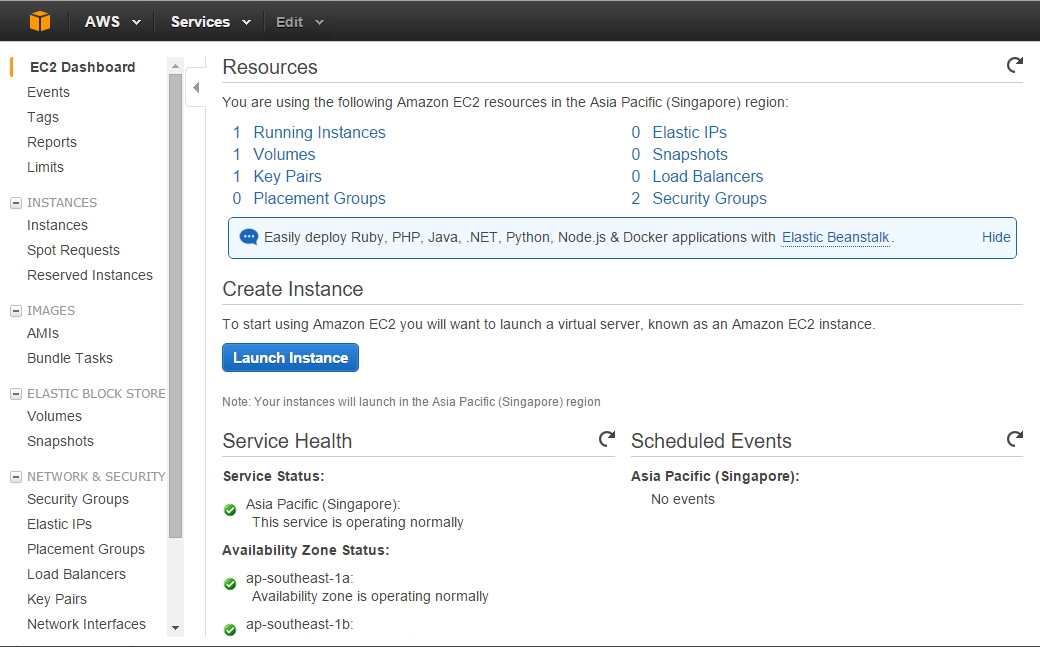
ٖFrom here, you should go to the Running Instances link to check your instances. You should see something like this:

Right now, we only have one instance of t2.micro configuration, running on public IP address defined under Public IP. We will first create an alarm to make sure we do not hit our cap when experimenting.
Click the Alarm icon under Alarm Status. You should see a pop up to configure an alarm. We are interested in making sure that the CPU usage is under certain limits. Let's create an alarm.
We want to generate an email alert whenever our instance is consuming over 90% of processing power for 1 hour or more.

We just created a new warning notification to my email address and also set an action to Stop the instance whenever our set limits are hit.
Note that on setting the email address, you will receive an email for confirmation. If your email address is not confirmed within three days, you'll stop receiving any alerts.
Now, let's come to our real objective. We will try to connect using SSH client for Windows, PuTTy. If you're on Windows, download and install the latest version of it. Follow the links for Linux and OSX.
When you've installed PuTTy, launch the PuTTy applications. You should be able to see a configuration window:
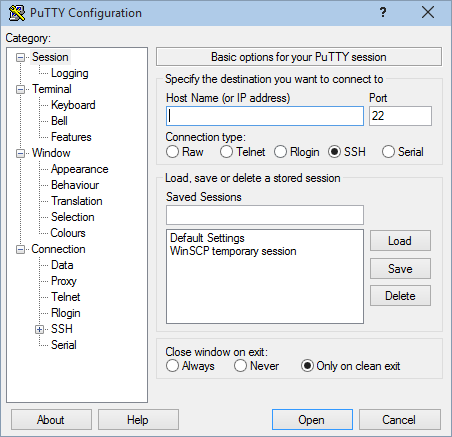
In the host name, put: ec2-user@your_public_dns. For example:
ec2-user@ec2-52-74-107-183.ap-southeast-1.compute.amazonaws.com
Next step is to provide a private key. Remember we generated a pem file in our earlier walk through? Well! PuTTY uses a ppk file, or PuTTY Private Key. We can easily generate this file from a utility called PuTTYGen; this tool installs with PuTTY. Leave the current window open as is and launch puttygen.exe from your PuTTY installation directory.

Go to conversions menu and import the pem key pair file created earlier. Mine is vision360-keypair.pem. You should be able to see the public key and the RSA fingerprint.

Click "Save private key" button and save the key as <your-key-name>.ppk. If PuTTY displays a warning for missing passphrase, ignore and proceed. I saved my file as vision360-keypair.ppk. Close this window and go back to PuTTY.
Go to Connection > SSH > Auth. Provide the path to private key we generated:

Click Open to connect to your EC2 machine. On first attempt, PuTTY should display a warning that the Server's host key was not previously registered and that you may not be connecting to the desired computer. Ignore this warning by pressing Yes; we know what we're doing :-)


That's it. You're in. The first thing you may want to do is to update the OS of your VM. Try the following command (this is similar to Ubuntu's apt-get):
$ sudo yum update
You'll note that the updates are downloaded and applied like a bullet train. This is because Amazon uses state of the art infrastructure and most optimal settings for the OS of its VMs.
Check your system's resources using some common commands:
To check disk space
$ df -h
To check memory
$ free -m

That's it for now, we'll get to some practical use of the Elastic Computing in future posts. The plan is to do some real-life data analysis on this.
Please comment if you find any mistake. Thanks...
In this post, we'll look at some ways to connect to your EC2 instance and try out an example. I'm assuming you already know how to get to the EC2 console page from AWS home.
ٖFrom here, you should go to the Running Instances link to check your instances. You should see something like this:
Right now, we only have one instance of t2.micro configuration, running on public IP address defined under Public IP. We will first create an alarm to make sure we do not hit our cap when experimenting.
Click the Alarm icon under Alarm Status. You should see a pop up to configure an alarm. We are interested in making sure that the CPU usage is under certain limits. Let's create an alarm.
We want to generate an email alert whenever our instance is consuming over 90% of processing power for 1 hour or more.
We just created a new warning notification to my email address and also set an action to Stop the instance whenever our set limits are hit.
Note that on setting the email address, you will receive an email for confirmation. If your email address is not confirmed within three days, you'll stop receiving any alerts.
Now, let's come to our real objective. We will try to connect using SSH client for Windows, PuTTy. If you're on Windows, download and install the latest version of it. Follow the links for Linux and OSX.
When you've installed PuTTy, launch the PuTTy applications. You should be able to see a configuration window:
In the host name, put: ec2-user@your_public_dns. For example:
ec2-user@ec2-52-74-107-183.ap-southeast-1.compute.amazonaws.com
Next step is to provide a private key. Remember we generated a pem file in our earlier walk through? Well! PuTTY uses a ppk file, or PuTTY Private Key. We can easily generate this file from a utility called PuTTYGen; this tool installs with PuTTY. Leave the current window open as is and launch puttygen.exe from your PuTTY installation directory.
Go to conversions menu and import the pem key pair file created earlier. Mine is vision360-keypair.pem. You should be able to see the public key and the RSA fingerprint.
Click "Save private key" button and save the key as <your-key-name>.ppk. If PuTTY displays a warning for missing passphrase, ignore and proceed. I saved my file as vision360-keypair.ppk. Close this window and go back to PuTTY.
Go to Connection > SSH > Auth. Provide the path to private key we generated:
Click Open to connect to your EC2 machine. On first attempt, PuTTY should display a warning that the Server's host key was not previously registered and that you may not be connecting to the desired computer. Ignore this warning by pressing Yes; we know what we're doing :-)
That's it. You're in. The first thing you may want to do is to update the OS of your VM. Try the following command (this is similar to Ubuntu's apt-get):
$ sudo yum update
You'll note that the updates are downloaded and applied like a bullet train. This is because Amazon uses state of the art infrastructure and most optimal settings for the OS of its VMs.
Check your system's resources using some common commands:
To check disk space
$ df -h
To check memory
$ free -m
That's it for now, we'll get to some practical use of the Elastic Computing in future posts. The plan is to do some real-life data analysis on this.
Please comment if you find any mistake. Thanks...
Comments
Post a Comment